
A single scratched derailleur or bent wheel can turn a ₹60,000 bicycle into a repair nightmare — and it happens more often than you’d think. Every year, thousands of bikes arrive at their destination with dented frames, snapped spokes, or misaligned gears, simply because someone skipped a few packing steps.
Whether you’ve sold a bike online, you’re relocating to a different city, or you’re flying out for a cycling event and want your own ride waiting there, shipping a bicycle isn’t as straightforward as dropping it at a courier office. Bikes are bulky, oddly shaped, and have plenty of delicate components that don’t forgive rough handling.
But here’s the good news — if you pack it right and pick the right shipping method, your bicycle can arrive in perfect condition without costing you a fortune. This guide walks you through the entire process, from disassembly to delivery.
Why Shipping a Bicycle Needs Special Attention
You can’t treat a bicycle like a regular parcel. Think about it — a bike has protruding pedals, a delicate derailleur hanging off the frame, thin spokes that bend easily, and disc brake rotors that warp if something presses against them. The handlebars stick out. The wheels are large and fragile.
Standard shipping boxes and basic bubble wrap aren’t enough here. Couriers handle thousands of packages daily, and your bike box will get stacked, shifted, and possibly tossed onto a conveyor belt. If you haven’t packed it properly, even one rough transition can cause damage you won’t notice until you try to ride.
There’s also the size and weight factor. Most bicycles weigh between 8–15 kg, but once you add packing materials and a box, you’re looking at a parcel that’s both heavy and oversized. Carriers often apply dimensional weight pricing to large packages, meaning you could pay more based on the box size than the actual weight. Understanding this before you ship saves you from surprise charges.
What You’ll Need Before You Start Packing
Let’s gather your supplies first. Running around looking for tape mid-packing is annoying, so get everything ready.
A bike box is your most important item. You have a few options here. You can buy a dedicated cardboard bike box from a shipping store — they typically measure around 140 x 80 x 20 cm. Or you can walk into any local bike shop and ask for one. Most shops have spare boxes from their own inventory and will give you one for free. A hardshell bike case works too, especially if you’re shipping an expensive road bike or carbon frame, though these are pricier.
Beyond the box, you’ll need foam pipe insulation (the kind used for plumbing pipes — fits perfectly over your frame tubes), bubble wrap, packing tape, zip ties, a set of Allen keys and a pedal wrench, cardboard pieces for extra padding, and a few plastic bags for small parts like bolts and quick-release skewers.
Pro Tip: If you’re unsure about how much bubble wrap you actually need, a good rule is to wrap each component until you can press firmly on the outside and not feel the hard part underneath.
How to Disassemble Your Bicycle for Shipping
This is the part that intimidates most people, but honestly, you don’t need to be a mechanic. You’re only removing a few key components — not stripping the bike down to the frame.
Step 1: Remove the Pedals
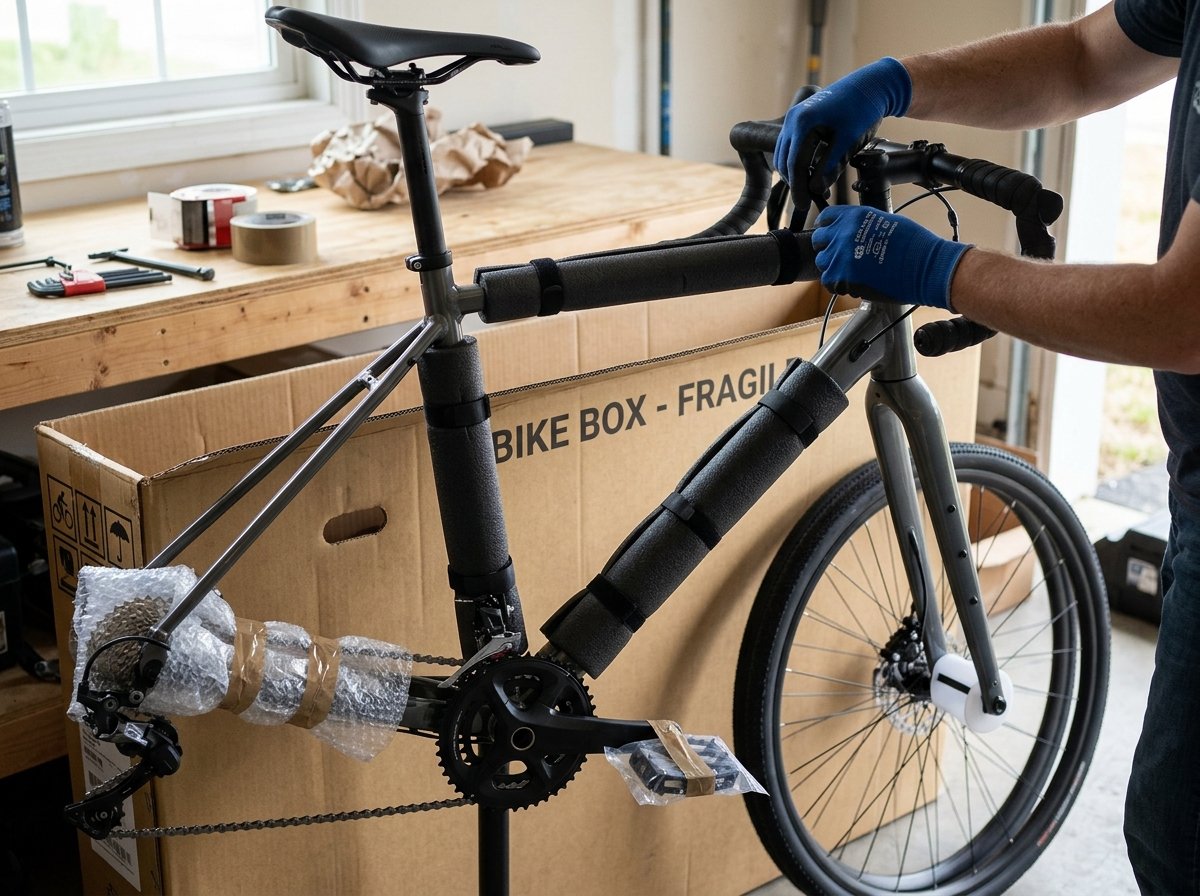
Pedals stick out and will puncture the box if left on. Use a 15mm pedal wrench or an 8mm Allen key (depending on your pedals). Here’s the tricky part most people forget — the left pedal has reverse threading. You turn it clockwise to loosen it, which feels wrong, but that’s how it works. The right pedal loosens normally, counter-clockwise.
Put both pedals in a plastic bag, label it, and tape it to the inside of the frame.
Step 2: Remove the Front Wheel
Open your quick-release lever or loosen the thru-axle. Slide the wheel out. If your bike has disc brakes, immediately insert a brake pad spacer between the pads. If you don’t have one, fold a piece of cardboard to about 4mm thickness and slide it in. Why? Because if you accidentally squeeze the brake lever during packing, the pads will close and you’ll have a headache realigning them later.
Deflate the tire to about half pressure. This prevents the tube from expanding if the package is stored in a hot environment or shipped via air freight where pressure changes happen.
Step 3: Turn and Lower the Handlebars
You don’t necessarily need to remove the handlebars completely. Loosen the stem bolts with an Allen key and rotate the handlebars 90 degrees so they sit parallel to the frame. This dramatically reduces the box width you’ll need. If your handlebars have wide grips or bar ends, you might need to remove those separately.
Step 4: Lower or Remove the Seat and Seatpost
Pull the seatpost out of the frame entirely. Mark the height with a piece of tape before you remove it — that way you can set it back to your exact riding position later. Wrap the seatpost and saddle together in bubble wrap.
Step 5: Protect the Derailleur
This is the component most people damage during shipping. Your rear derailleur hangs off the frame and is basically a sitting target for impact. You have two options: either remove it completely (unbolt it and tape it gently to the chainstay, still attached by the cable) or wrap it heavily in bubble wrap and cardboard and secure it tightly to the frame with zip ties.
If you’re shipping a high-end bike with a Shimano Ultegra or SRAM Force groupset, I’d recommend removing it. The replacement cost alone justifies the extra five minutes of work.
How to Pack the Bicycle in the Box
Now that your bike is partially disassembled, it’s time to actually pack it. This is where careful layering matters.
Start by sliding foam pipe insulation over the frame tubes — the top tube, down tube, and seat tube at minimum. This protects against scratches and dents from items shifting during transit. Wrap any exposed metal-to-metal contact points. Wherever the frame could touch a component inside the box, put padding between them.
Place the frame in the box first. Position it so the bottom bracket and fork dropouts rest on the bottom of the box. Some people place a small block of wood or dense foam under the fork dropout to prevent it from being crushed if something heavy lands on the box.
The front wheel goes alongside the frame. Place a piece of cardboard between the wheel and the frame so the disc rotor or hub doesn’t scratch the paint. If space allows, the rear wheel stays on the bike. If not, remove it and place it on the opposite side of the frame with cardboard separating them.
Tuck the seatpost, pedals, and any other small parts into the gaps. Fill empty spaces with crumpled newspaper, packing peanuts, or extra bubble wrap. The goal is zero movement inside the box. Pick it up and shake it gently — if you hear or feel things shifting, add more padding.
Seal the box with strong packing tape. Run tape along every seam, and add extra strips over the corners. If you’ve ever seen what happens due to common packaging mistakes that damage parcels, you know that a weak corner is where boxes fail first.
Label the box clearly: “FRAGILE — BICYCLE — THIS SIDE UP” with arrows showing the correct orientation.
Choosing the Right Shipping Method
You’ve got a well-packed bike. Now, how do you actually ship it? Your options depend on where the bicycle is going — across the country or across the world.
Domestic Shipping
For shipping within your country, you can use major carriers like FedEx, UPS, or your national postal service. Many of them accept oversized packages, though you’ll pay a premium. Some cycling-specific services like BikeFlights (US), SendBike (Europe), or specialized freight carriers offer better rates because they handle bikes regularly and know how to manage them.
The cost for domestic bicycle shipping typically ranges from $50 to $150 depending on distance and speed. If you’re deciding between standard and expedited shipping, standard works fine for most situations unless you need the bike for a race or event by a specific date.
International Shipping
Sending a bike overseas gets more complex. You’ll deal with customs forms, potential import duties, and higher costs. International bicycle shipping can cost anywhere from $150 to $500+ depending on the destination.
Carriers like DHL, FedEx International, and UPS all handle bike shipments globally. If you’re trying to figure out which carrier gives you the best deal, comparing DHL vs FedEx for international shipping can help you make a smarter choice. Each has different strengths for different routes.
For international shipments, you also need to check shipping restrictions to your destination country — while bicycles themselves aren’t restricted items, battery-powered e-bikes can fall under dangerous goods regulations because of their lithium batteries.
Freight and Specialty Bike Shippers
If you’re shipping a very expensive bike — think $3,000+ carbon road bikes or custom builds — consider specialty bike shipping services. They use custom crating, handle insurance, and sometimes offer door-to-door service. You’ll pay more, but the peace of mind is worth it for high-value bikes.
How Much Does It Cost to Ship a Bicycle?
Cost is probably your biggest concern, so let me break this down honestly.
The price depends on three main factors: distance, weight (or dimensional weight), and speed. A standard bicycle in a cardboard box typically ships as an oversized parcel. Most carriers calculate shipping cost based on whichever is greater — the actual weight or the dimensional weight. Since bike boxes are large but relatively light, dimensional weight usually wins, and you end up paying based on box size rather than how much it actually weighs.
For domestic shipping within the US, expect $50 to $150. Within the UK or Europe, it’s usually £30 to £100. International shipments from the US to Europe or Asia run between $200 and $500. If you’re shipping to remote locations or island nations, add 20–30% more.
Want to keep costs down? Compare quotes from multiple carriers. Using a quote comparison tool or checking how to compare courier quotes can save you real money, especially on international routes. Some shippers offer discounted rates for bike-sized packages that individual carriers don’t advertise publicly.
Warning: Don’t choose the cheapest option blindly. A carrier that offers rock-bottom rates but has no tracking, no insurance, and a reputation for rough handling isn’t saving you money — it’s risking your bike.
Should You Get Insurance?
Short answer — yes.
Shipping insurance typically costs 1–3% of the declared value. For a $1,000 bike, that’s $10–$30. If anything goes wrong — and with oversized parcels, the odds aren’t zero — you want to be covered.
Most carriers include basic liability coverage (around $100), but that won’t come close to replacing a decent bicycle. Always opt for full value coverage, especially for carbon frames, which can crack internally without visible exterior damage. You can read more about insurance for shipped packages to understand what’s covered and what isn’t before you buy.
Pro Tip: Take photos of your bike from every angle before you pack it. Photograph the serial number, any existing scratches, and the components. If you ever need to file a claim, this documentation makes the process much smoother.
Shipping an E-Bike: Extra Rules Apply
Electric bicycles come with a specific challenge — the lithium-ion battery. Most major carriers classify lithium batteries above a certain watt-hour rating as dangerous goods. This means you might not be able to ship your e-bike battery through regular parcel services.
Here’s what you typically need to do: remove the battery from the bike, ship it separately using a carrier approved for dangerous goods shipping, and ensure the battery is at 30–50% charge (not fully charged, which increases risk during transport).
Some airlines and carriers refuse lithium batteries entirely on certain routes. Always check with your specific carrier before booking. The last thing you want is your shipment rejected at the depot because of a battery issue you could’ve handled in advance.
Receiving the Bicycle: What to Do on Arrival
Your bike has arrived — but don’t just rip the box open and start riding. Follow a quick process.
Inspect the box before signing. If there’s visible damage — crushed corners, punctures, water damage — note it on the delivery receipt and take photos immediately. This protects your right to file a damage claim later. If you’ve ever dealt with a package that was marked delivered but had issues, you know how important documentation is during delivery.
Open the box carefully and check every component. Look at the frame for cracks, dents, or scratches that weren’t there before. Spin both wheels to check for wobbles. Check the derailleur hanger — this thin piece of metal bends easily and is the most common casualty of shipping.
Reassemble in the reverse order of how you took it apart. Set the seatpost to the height you marked earlier. Install the front wheel and make sure the disc rotor sits cleanly between the pads. Thread the pedals back in — remember, left pedal is reverse threaded. Tighten the handlebars to the correct torque spec (usually 4–6 Nm for a carbon steerer, higher for aluminum).
Take a short test ride around the block before heading out on a full ride. Check that the brakes engage properly, the gears shift smoothly, and nothing feels loose.
Quick Tips That Most Guides Skip
Here are a few things I’ve learned from shipping bikes multiple times that rarely get mentioned.
Protect the axle dropouts. These are precision-machined surfaces. If they get dented or bent, your wheel won’t sit straight. Cut small pieces of dense cardboard and tape them over the dropouts after removing the wheels.
Zip-tie your brake levers. If you have hydraulic disc brakes, zip-tie the brake levers to the handlebars in the “pulled” position after inserting the pad spacer. This prevents accidental squeezing during transit that could introduce air into the system.
Ship the bike chain-side protected. The drivetrain side of your bike (the side with the chain, chainring, and derailleur) is the most vulnerable. Always position this side facing inward in the box, away from the outer wall.
Consider the season. Shipping rates spike during holiday seasons — November through January especially. If you’re planning ahead, ship during off-peak months for better rates and faster delivery times. If you’re shipping around a holiday, our shipping guides for specific seasons can help you plan better.
FAQ
Can I ship a bicycle through regular postal mail?
Yes, most national postal services and major carriers like FedEx, UPS, and DHL accept bicycles as oversized parcels. You’ll need to pack the bike in a proper bike box and meet their size and weight limits. Check weight and size limits for international parcels for your specific carrier before you drop it off.
How long does it take to ship a bicycle?
Domestic shipments usually take 3–7 business days via ground and 1–3 days via air. International shipping ranges from 5–14 business days depending on the destination and carrier. If you need it faster, ground vs. air shipping comparisons can help you decide based on urgency and budget.
Do I need to fully disassemble my bicycle before shipping?
Not fully. You typically need to remove the pedals, front wheel, and seatpost, and turn the handlebars sideways. This reduces the box size and protects the most vulnerable parts. Full disassembly down to the bare frame is only necessary if you’re using a very compact shipping case or if your carrier has strict size restrictions.
How do I ship a bicycle if I’m moving abroad?
If you’re relocating, shipping your bike alongside your other belongings can be cost-effective. Freight shipping or using a relocation specialist often works better than parcel carriers for this. Check out our guide on how to ship belongings when moving abroad for a full breakdown of your options.
Is it cheaper to ship a bicycle or buy a new one at my destination?
For bikes under $300, the math sometimes favors buying new, especially for international shipping. But for mid-range and high-end bikes — anything above $500 — shipping is almost always cheaper than replacing. Factor in that a new bike also needs fitting and adjustments that your current bike already has dialed in for your body.
Your Bicycle, Delivered Safe
Shipping a bicycle isn’t complicated once you know the steps. It just requires a bit more care than your average package. Disassemble the key parts, pad everything thoroughly, choose a reliable carrier, and get insurance for anything you’d be upset to lose.
The whole packing process takes about 30–45 minutes once you’ve done it the first time. And that investment of time protects hundreds or thousands of dollars worth of bicycle from becoming an insurance claim.
If you’re shipping other unusual or fragile items alongside your bike — maybe a guitar, some artwork, or expensive electronics — the same principles of careful packing apply. Check out our guides on shipping musical instruments or shipping artwork and paintings for item-specific tips.
Now go pack that bike — and ride it on the other side. 🚲